Hummus – making hummus with dry chick peas

I love hummus. Actually, the whole family loves the stuff and it thrills me that the kids enjoy it so much. They love getting hummus in their lunch for school along with some pita bread, or bread sticks. I was very happy to learn how to make hummus with dry chick peas.

Hummus is quite healthy since chick peas are low in calories and are a good source of protein and fibre. Olive oil is also one of the best oils you can use containing essential fatty acids and antioxidants. Making hummus at home is simple, far cheaper and allows you to control the ingredients.

I make hummus at least once a month for years. Each time I make it I use canned chick peas. I even posted the recipe for hummus here. I have often heard that using dry chick peas produces a far superior hummus; one that is creamier and tastier than that with the canned peas.  Using canned peas is just so much easier and does not require you to decide to make hummus the night before, so I have never gotten around to trying it.

Finally, I have tried hummus with the dry peas and everyone who told me it is the best way to make hummus is correct. I loved it and will likely make it this way more often.

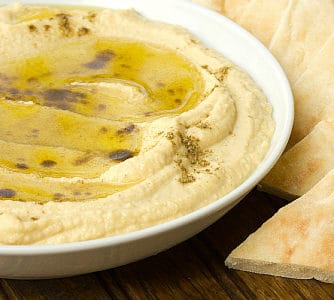
The cumin and olive oil can be stirred into the hummus, but I prefer the flavour if it is drizzled on top. It also looks much more attractive plated this way.

If you are wanting to try so new kinds of hummus, check out these few varieties of hummus:

Hummus - making hummus with dry chick peas

4.70 out of 5
53 reviews
Print
Making hummus with dry chick peas instead of canned. A traditional recipe with olive oil, ground cumin and tahini. This recipe is creamy and delicious, 
Prep Time: 12 hours
Cook Time: 1 hour
Total Time: 13 hours
Servings: 6 cups

Ingredients

  • 2 cups dry chick peas
  • 2 tsp salt
  • 1 tsp baking soda
  • water
  • juice of half of a lemon
  • 3 tbsp tahini
  • 2-3 garlic cloves
  • 1/2 cup water (or more if needed)
  • 1/3 cup olive oil
  • 1 tbsp ground cumin
  • pita bread , crackers, etc.

Instructions

  • Place the dry chick peas in a large bowl or pot and fill with water so that the water is at least an inch or two above the peas. Let them soak overnight in the fridge.
  • Drain the chick peas. Place them in a pot and fill with new water, the salt and baking soda.
  • Bring the chick peas to a boil. Once the water is boiling, lower the heat so that it is a low boil. Cook the chick peas for an hour. They should soften so they can easily be smushed with your fingers.
  • Drain the chick peas and let them cool until they come to room temperature.
  • Using a food processor, pulse the chick peas, lemon, garlic cloves and tahini. While the food processor is running, slowly pour in the water. Check the texture and thickness of the hummus. If needed, add more water to desired consistency.
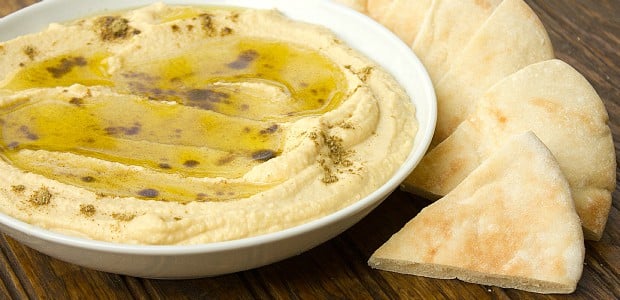
  • When serving, scoop into a bowl and drizzle olive oil and sprinkle cumin on top of the hummus.
  • Serve with pita bread, crackers, or veggies.

Categories

Did you try this recipe?

Leave a comment and let me know how it turned out. Or, take a picture to share on Instagram and tag me @theblackpeppercorn.

Leave a comment

Recipe Rating


117 comments

  • Perfect recipe to build upon.
    My daughter has discovered a new cleaner diet and is spending more time in the kitchen… making hummus!
    Any tips on getting a teenager to do the dishes after creating a prize winning mess?

    Great comments people. Refreshing to see so much respect on a public platform!

    • Reply
  • 5 stars
    First time using dried chickpeas & I love it, tastes absolutely delicious, I added more garlic (just love garlic) Its a super base for different flavours, my fave is Smoked Paprika, yum! Thank you for sharing.

    • Reply
  • I have just used this recipe and made the best hummus that I have ever had. Thank you for sharing it with us. It is superb

    • Reply
  • Hungry just reading this !!!!

    • Reply
  • Fantastic. So easy to do. So different from shop bought or even making from tinned chick peas. This is definitely the way forward from now on. I would say start with the basic measurements and adjust to taste. I found I needed a little more garlic (depends on size of cloves) and lemon juice but less water.

    • Reply
  • Thanks for a great recipe! 1st time making houmous with dried chickpeas. I added some olive oil in when I whizzed it all together too. Also did a whole lemon.

    • Reply
  • Hi
    Lovely simple recipe.
    I like adding a sprinkle of sumac instead of the cumin at the end and a sprinkle of chilli or paprika for those who don’t like it spicy.
    It doesn’t change the flavour much and adds some nice colour on the top.
    Sometimes I like sprinkling finely spiced spring onions on the top or toasted pine nuts..I guess anyth ing goes . But your base , the hummous is a nice traditional recipe do thanks for sharing. I 2²

    • Reply
    • 5 stars
      Oooopss I forgot to rate you 5 stars!!

      • Reply
  • 5 stars
    This recipe turned out really well. Since this makes a lot of hummus I divided it into 3 batches and made the recipe above, and then one batch with cilantro/coriander and one batch with smoked paprika. All taste great!

    • Reply
  • When making Hummus-B-Tahini from dried Chickpeas I like to peel the skin off the Chickpeas to remove the bitterness of the skin and make creamier Hummus. However, I don’t bother when using canned because of the pickling effect on the skin . I also like it a little more tangy flavor for two cups of dried Chickpeas the juice of a whole lemon. Bottom line there are so many ways to make Hummus-B-Tahini there is no right or wrong way because people can adjust flavors to their own liking. Bone Appetite!

    • Reply
  • Great recipe…skip the baking soda don’t need thickner

    • Reply
    • For all the baking soda in the water is to soften the chickpeas and so the skin will go off easier / float to the service so you can skoop it out

      • Reply
  • Very tasty – thanks for sharing.
    Also, note to self for next time: cut the recipe in half! Two+ cups of dry chick peas makes a fair amount of hummus. On the bright side, I am well set for the week. 🙂

    • Reply
  • Hummus is nice and simple to make,
    Once you have mastered the recipe, you can tweek it with lots of other flavours, mine is with fresh corriander, and chilli flakes.

    • Reply
  • 5 stars
    I have been wanting to make hummus for many years, having enjoyed it while living in the Middle East. I happily came upon your recipe & gave it a try this weekend. The clear & easy recipe worked well for me, and I seasoned it to taste based on your guidelines. I really appreciated the comments of others & chose not to use the baking soda, and salted during the blending phase.
    Compliments on a super site & regards from South Africa.

    • Reply
    • Thanks for stopping by! So glad you enjoyed the hummus.

      • Reply
  • 5 stars
    I love this hummus. I usually make half the recipe. I add the garlic…4 cloves…to the chickpeas as they cook, which mellows it out nicely. Instead of adding plain water, I add the chickpea cooking liquid, to which I’ve added salt at the end. I use my Vitamix for a super smooth consistency. Then I make my own pita, but that’s another show.

    • Reply
  • 5 stars
    This is a wonderful Hummus recipe!! Perfect combination of ingredients.

    • Reply
  • 5 stars
    I’ve just made this – using dried chickpeas for the first time and am very very impressed with the texture. I didn’t get rid of the skins, any loose ones kind of floated to the surface when I put them in water so I removed them then.
    The hummus is SO smooth with a lovely subtle flavour. I added quite a lot of garlic and the juice of a whole lemon but otherwise followed the recipe.
    Marvellous! Glad to see that it freezes well. My next stop is making my own tahini!

    • Reply
  • 5 stars
    Thanks for the recipe! The best hummus I have ever had 😀

    • Reply
  • 5 stars
    I just made this and woah, never going back to canned chickpeas! It is much more affordable (I buy dry organic chickpeas so I guess it sort of evens out) and I have also been getting really interested in sprouting my own beans for nutritional purposes. Will experiment with sprouting my beans after soaking them next time! Thank you for this wonderful recipe! I used my blender and added the wet ingredients first to help blend and instead of cumin used paprika for the toppings. Beautiful and YUM!!!!

    • Reply
  • 5 stars
    My chickpeas are simmering on the stove right now….I can’t wait to try this. I love hummus, but the price for the amount you get is unbelievable, especially when you go through it like I do. I was looking for the most economical way to make my own; the canned chickpeas make a decent hummus, but it didn’t really thrill me. I know fresh is always better, and after reading the reviews I’m sure this will be very tasty. Thanks for sharing.

    PS-does anyone have any idea how long this will keep in the fridge? I may cut the recipe in half if I can’t eat it all in a reasonable time(which I doubt) but it would be good to know.

    Cheers and thanks.

    • Reply
    • Hi Toni, and others wondering about the duration of hummus’ life span.

      Freeze it in pottles. I am a one person household, and things sometimes get lost in the fridge. I batch it out into daily pottles and freeze it. I pull one out to take to work with fresh bread and a salad and it’s defrosted by lunch time. Size the pottles for your lifestyle – mine are 100gms which suits my needs generally, and I can take out two if I feel irrational greed come over me.

      This is a good recipe and this is a wonderful message thread with consistent kindness towards each other. ?

      • Reply
  • I cook my dry chick peas in a little chicken broth in the pressure cooker for an hour then I save the broth while it is warm place chickpeas into the processor and mix on high until ground slowly adding enough of the broth to make smooth consistency then I add the rest of my ingredients. I love to eat it warm.

    • Reply

Subscribe to the newsletter and never miss a recipe!